
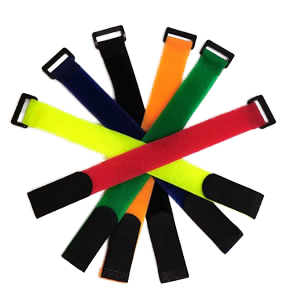


Tip Types
The round tip requires an extra cut in order to create a half circle at the end of the hook. After the round cut has been made, the cutting machine slides the material down the necessary length and makes a straight cut to finish the length of hook, called the tip. The next round cut occurs just after that, in order to create the round tip for the next piece.
The bullet nose tip follows the same process as the round tip, with the main difference being appearance. A bullet nose tip is a triangular tip cut with a rounded point, just like the end of a bullet. This design makes it easier to feed the tip through the ring of a cinch strap.
The EZ peel tip is designed for its ease of use, especially for those who wear protective gloves, like shippers or fire fighters. The EZ peel tip is manufactured by first accounting for an additional length of hook. That additional length is taken and folded under itself and then welded. This creates a tab that does not fasten to the loop, making it easier to peel off. This requires added material length, as well as an additional weld.
Step 4: Welding/Sewing

The fourth step is Welding/Sewing. Welding occurs via a machine called an Ultrasonic Welder. This machine generates high-frequency sound waves that create friction, heating the hook and loop as they are held under pressure by the press arm. This process creates enough heat to melt the materials together, creating a strong bond. The press arm is approximately 0.5” wide, creating an ineffective portion of overlapping hook and loop that forms the weld. This must be taken into account in steps 1-3 to ensure an accurate total strap length. Read our blog post about ultrasonic welding applications to learn more about this process.
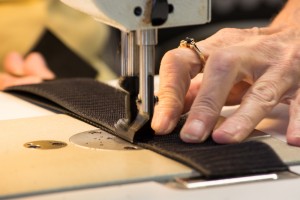
When sewing, the edges can be brought up right next to each other, so there is no overlap of materials. Box stitches are used to secure rings, and meticulous stitching is used to attach the hook and loop to webbing for straps that require superior strength and durability.
Step 5: Logo Imprinting
Logo Imprinting is a step that in itself requires several steps. A cliché must be designed, made, installed into the pad printer, and loaded with ink.
The printing pad then transfers the ink from the cliché to the length of hook, while the ink refills the cliché. The pad presses the ink onto the hook, lifts up, then slides the hook material down to be cut while the ink pad returns to the cliché. The ink dries in a fraction of a second. The hook is then tipped and cut, completing this step.
Step 6: Rings
This step involves the installation of a ring, which are used on cinch straps, to form a stronger hold. Rings can be attached by ultrasonic welding, or by box stitching the loop to itself. There are various rings, buckles, slides, hooks, and tabs. HookandLoop.com stocks black and white plastic rectangular rings, metal rectangular rings, metal D rings, tri-slides and chafe tabs, just to name a few. Each piece has a different application than the others.
Step 7: Grommets

In the final step, adding grommets to your strap is a great way to secure your strap to a pole or rafter. Grommets are metal eyelets that are driven through material, in this case hook and/or loop, in order to protect that material from damage caused by tying it down.
Generally, wire, cable or string is run through the grommets to secure the strap in place, much like a banner being tied to a tree or fence. These grommets are also used to protect the strap when screws or nails are driven through them to secure them in place.
Whether your business requires a simple 4” x 8” Back strap, or a 2” x 70” Cinch strap with a metal rectangular ring, logo imprinting, and a grommet, at HookandLoop.com, we can make any strap you can dream up.


